In this SailPoint tutorial post we will learn about the Managed attributes, how to make any attribute as Managed attribute and what are the benefits to make an attribute as Managed attribute in SailPoint IIQ.
In the SailPoint Attribute Post, we learnt that attributes are like placeholder to store the values of an Identity account.
Managed attribute is an additional feature of any attribute in SailPoint. if any attribute is marked as a managed attribute then that attribute will be treated as an entitlement and that information will be saved to Entitlement catalog.
Why we need Managed Attributes
During aggregation some times, we have single source of data that contain users information and user’s entitlement information club together, In that case to distinguish between the entitlement and other user’s information attributes we need to mark that column as managed attribute.
Benefit of Managed Attribute
if any attribute is marked as managed attribute, then that attribute will act as entitlement attribute and that will save into Entitlement catalog. Thus, we need not to do any additional efforts to save entitlements in SailPoint IIQ. It means if any attribute is marked as managed attribute then everything will be taken care by SailPoint only.
How to configure Managed Attribute
To make an attribute as managed:
- Go to Application ( Go to Applications -> Application Definition)
- select the application in which you want to create managed attribute.
- Go to Configuration -> Schema
- Select the attribute you want to make as Managed attribute.
- click on the Edit link.
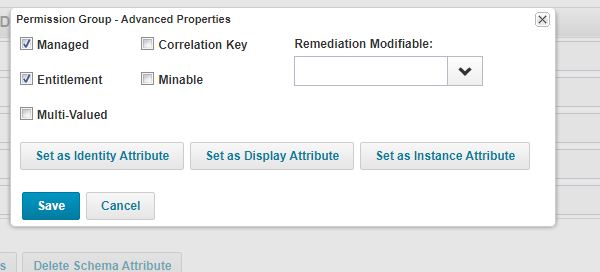
- popup appears. mark as Managed and Entitlement

- Click on Save and save the application. you have created one managed attribute in SailPoint IIQ.
now if you want managed attribute values goes to Entitlement catalog, then Run the account aggregation of that application, but before that you have to select one option in aggregation task.

